
Travel Blogging: The Ultimate Guide for Beginners
Do you want to learn how to start a travel blog?
If you love to travel and want to share your travel tips and adventures with the world, starting a travel blog is perfect for you. I wrote this step-by-step guide to teach you how to start your own travel blog in under an hour, even if you’re a complete beginner.
I love having a travel blog because I can write about one of my favorite topics (travel!) and make money while doing it. Even though I only work on this blog part-time, I am able to earn thousands of dollars every month from my blog.
So are you ready to start your own travel blog? Here’s what you need to know!
If you want to get more detailed lessons delivered directly to your inbox, sign up for my FREE 5-day e-course on how to start a successful travel blog:
How to Become a Travel Blogger
Here’s how you can start your blog with step-by-step instructions that you can follow along.
Note: All the links in this page will open in a new tab, so you don’t lose your place. If you’re not ready to start today, bookmark this guide to come back to it later
Step 1: Choose a niche
The first step to starting a travel blog is deciding on your niche.
Your niche is simply the topic that you blog about. For example, there are blogs out there in niches like fashion, cooking, parenting, personal finance, and so on.
I know what you’re probably thinking: isn’t my niche just travel?
Yes, travel in itself is a niche and it’s okay to have a general travel blog.
In fact, Wander Her Way is pretty “general” in that I write about many destinations and topics within the travel sphere, but I give it a solo female traveler twist.
However, if you can “niche down” further, there are many benefits to doing so. Like, attracting readers that are interested in a very specific topic, will make it easier for you to create content that they’ll enjoy, share, and comment on, as well as more likely to read more articles (= more ad revenue) and click your affiliate links (= more commissions).
Here are some travel niche ideas:
- Sustainable travel
- Luxury travel
- Budget travel
- Country-specific travel
- City-specific travel
- Solo travel
- Couples travel
- Family travel
- Working abroad
- Travel for retirees
- Adventure travel
- Living in a van or RV
- Cruise travel
These are just a few examples of specific travel niches. If you don’t have a particular niche in mind, that’s okay too! You can be successful with a travel blog either way.
You can always start off writing about whatever you want related to travel, and narrow down your focus as time goes by and you realize what you enjoy writing about most.
Step 2: Choose a name for your travel blog with matching domain
The first step to starting a travel blog is choosing a name for it. Your blog name will be the first impression that you have on people, so it’s important to pick a good one!
Here are some tips for choosing the perfect travel blog name:
- Make sure it’s easy to spell, pronounce, and remember.
- Don’t use hyphens or numbers in your name because it makes it harder for people to spell and remember.
- Try to choose a name that has the .com ending available. Avoid endings like .net or .org as they are less common and harder to remember.
- Check to see that the corresponding social media handles are available.
- Make it travel-related. Think Adventurous Kate, Nomadic Matt, The Blonde Abroad, and Wander Her Way (#shamelessplug).
- Pick something you can grow with. Don’t choose “Traveling with Toddlers” because your toddlers will grow…
- Keep it professional if you plan on monetizing your blog. It will be easier to get accepted into ad networks and affiliate programs.
- When in doubt, you can always just use your own name.
👉 If you need some help coming up with a name for your blog, here are suggestions for choosing a travel blog name and how to brainstorm ideas if you have no idea where to start.
Step 3: Get hosting for your travel blog
Once you have chosen a name for your travel blog, you will need to register it and get web hosting.
If you buy your domain name through an outside company, you can expect to pay $15 to $20 a year for it. However, if you sign up for web hosting through Bluehost, you can get your domain name for free.
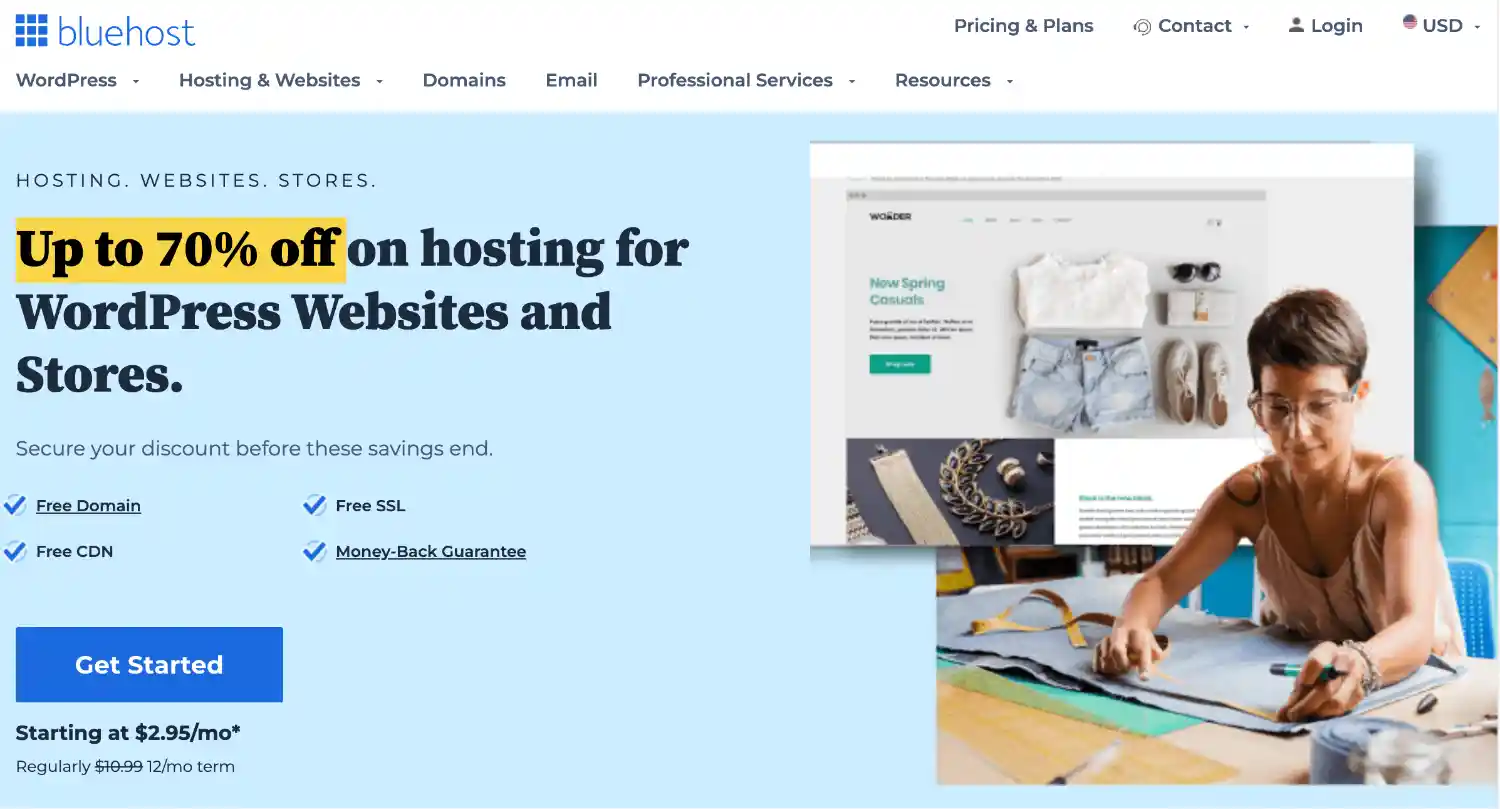
If you’re just starting out, I highly recommend Bluehost for web hosting. They are the company I and many other bloggers use for starting new blogs and websites. They are easy to use, have some of the cheapest hosting plans out there, have a reliable hosting service, and decent customer support.
Granted, there are more powerful hosting providers out there with more responsive customer service but if you’re just getting started, it’s not worth the investment. Bluehost is enough to get your feet wet in the travel blogging pool. Then, when you begin to make some money, you can upgrade to a hosting company like BigScoots (where Wander Her Way is hosted now).
Bluehost has been generous enough to offer readers of Wander Her Way 70% off their new web hosting plans. So for only $2.95 per month you can get WordPress hosting AND a free domain name!
🩵 Get 70% off WordPress hosting with Bluehost
How to sign-up with Bluehost
Here are the detailed steps to set up web hosting with Bluehost:
1. Click the “Get Started” button
2. Select your hosting plan
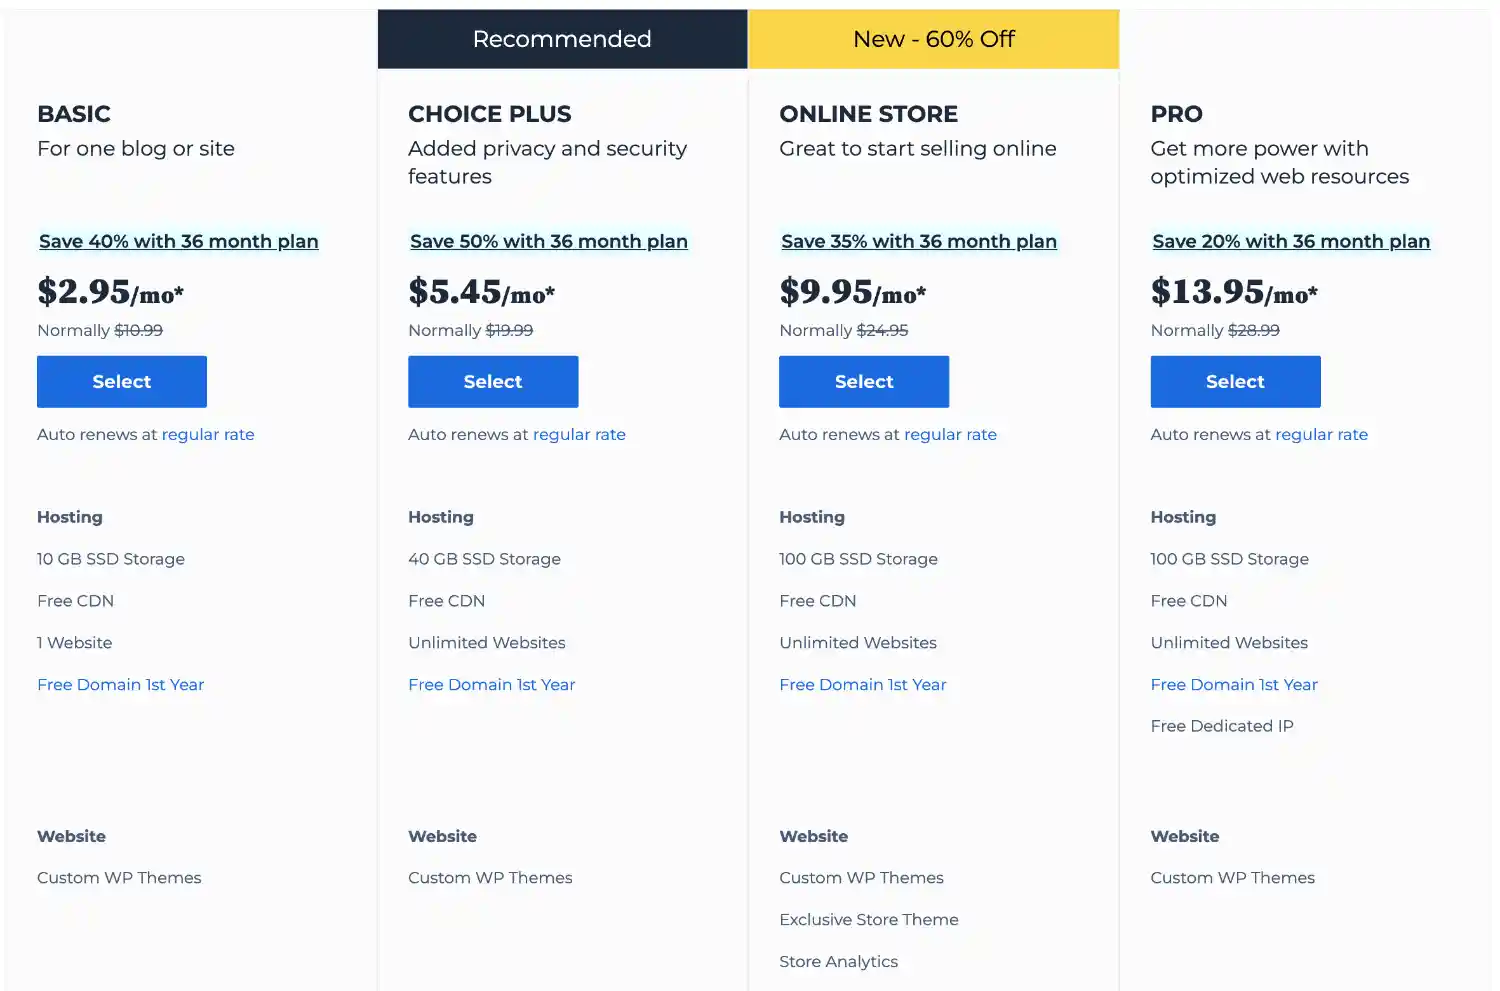
Which plan to choose: I recommend the basic plan for new bloggers.
I’m personally on the plus plan, but that’s only because I run multiple blogs. Otherwise I would probably choose the basic plan!
3. Put in your domain name
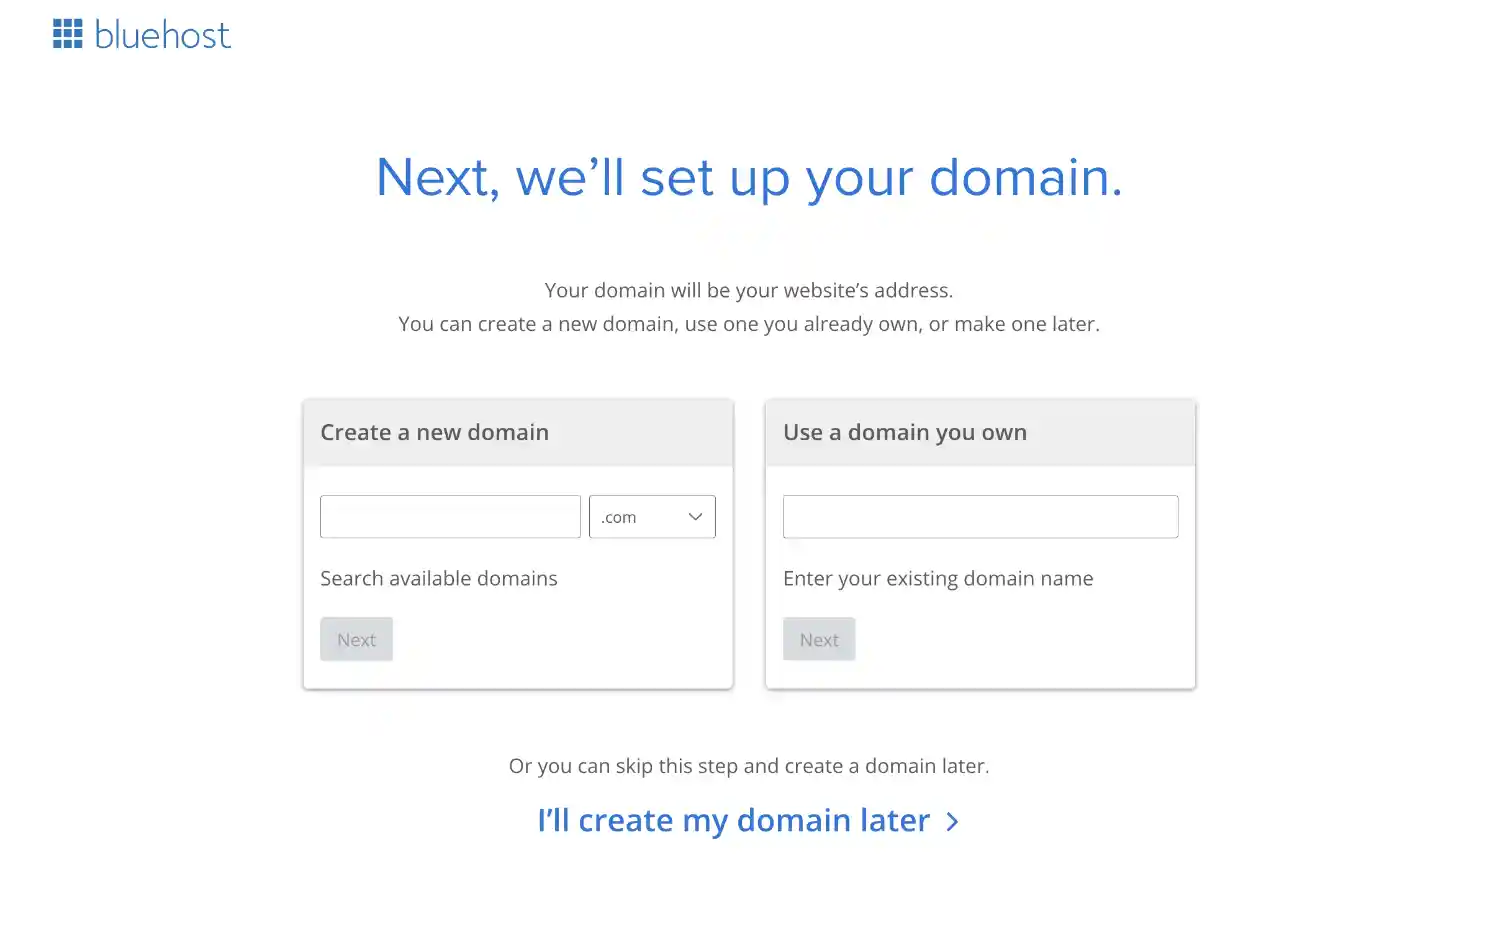
This is where you’ll put in the domain name that you decided on earlier.
What if I haven’t decided on a name yet? If you haven’t decided on a domain name for your travel blog yet, wait a couple minutes and this offer will pop up on your page:
Select this option and you can go ahead and start setting your blog up, then use the free credit to buy your domain name later.
4. Create your account
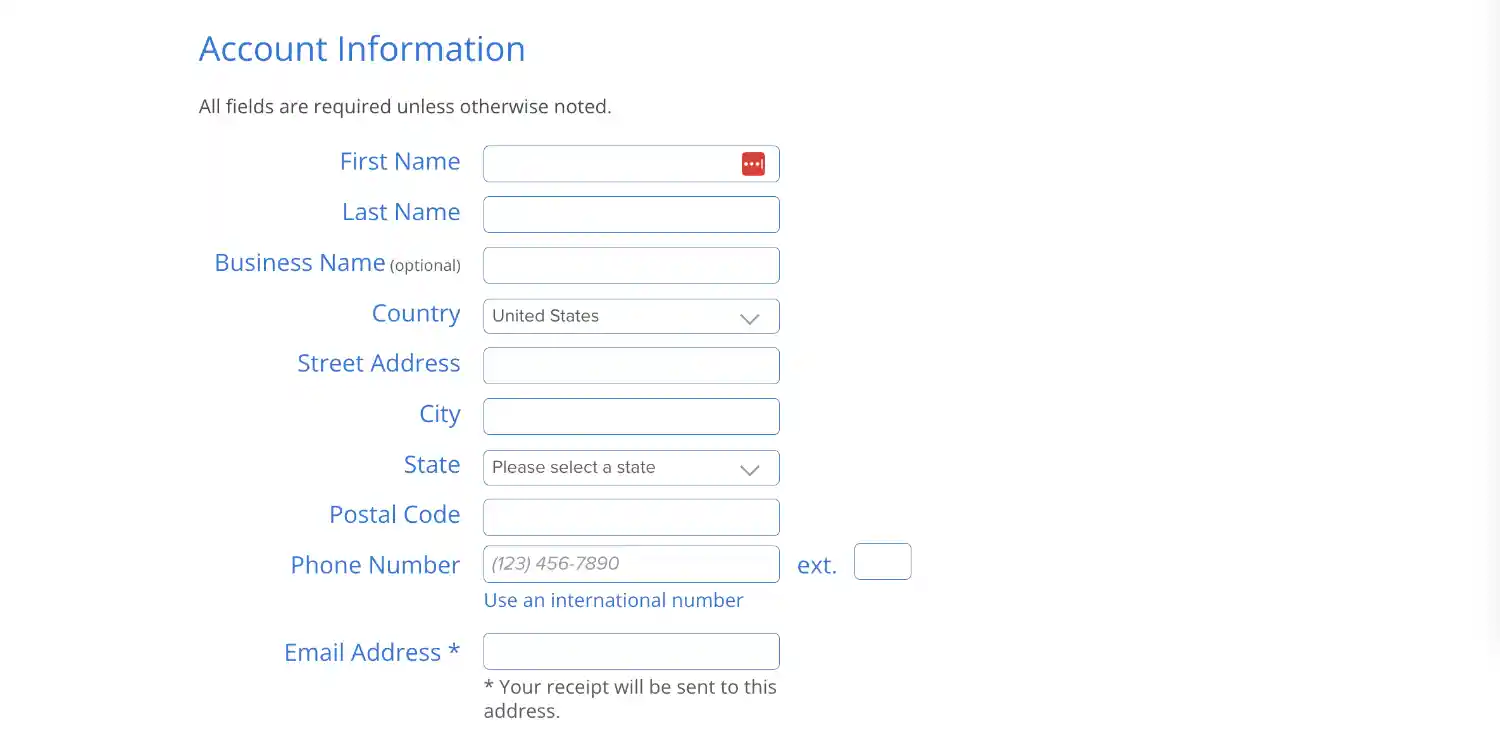
5. Select your package and pay
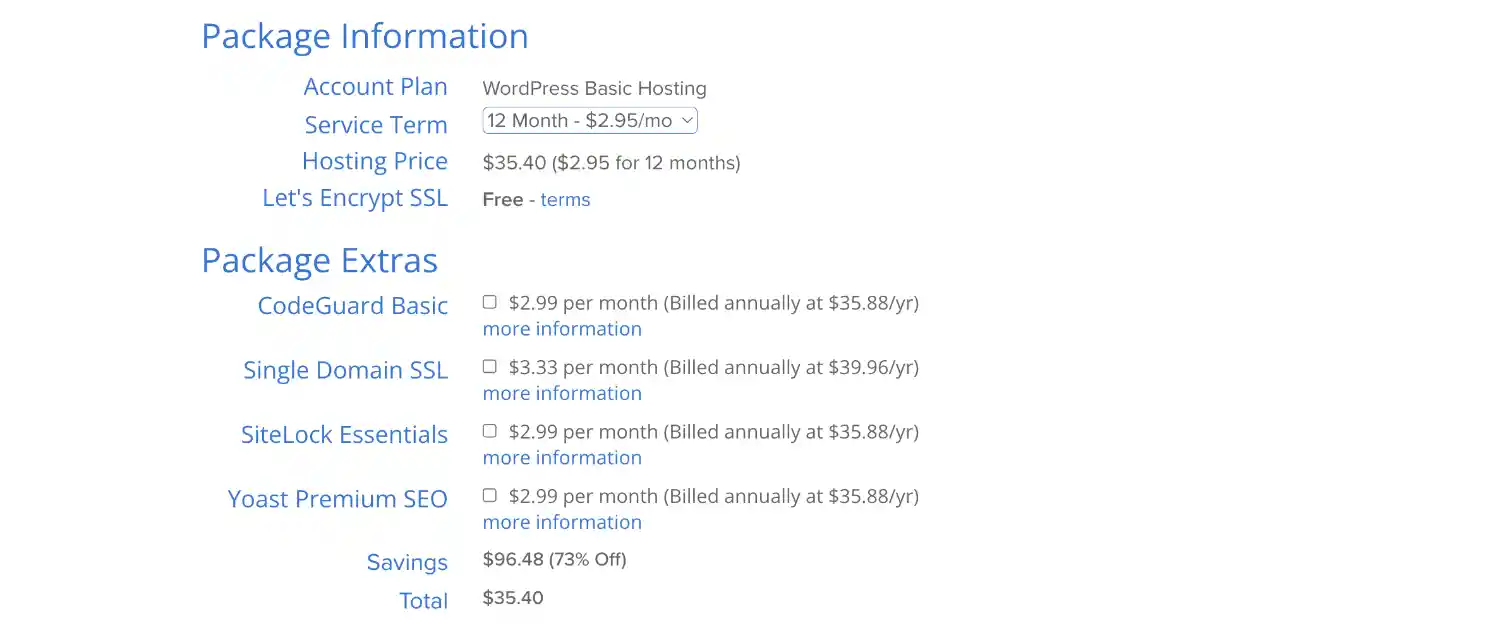
Here’s where you’ll select your hosting plan. The 36-month plan is the best deal at $4.95 a month for the first three years, but to keep your starting cost as low as possible, you can pick the 12-month plan at only $2.95 a month.
What about package extras? You have the options to add on extras like SiteLock and Yost Premium SEO. I personally don’t recommend any of these because there are free WordPress plugins you can install that do the same thing. Which I’ll cover in the next section of this guide.
This is not to say these are not needed, but they are not essential for a new travel blogger at the beginning stages so save your money right now!
6. Congrats, you’re done!
Once you check out, you’ll be redirected to your Bluehost dashboard, which will look something like the image below. Your dashboard is where you can log in to your blog for the first time and start setting everything up.
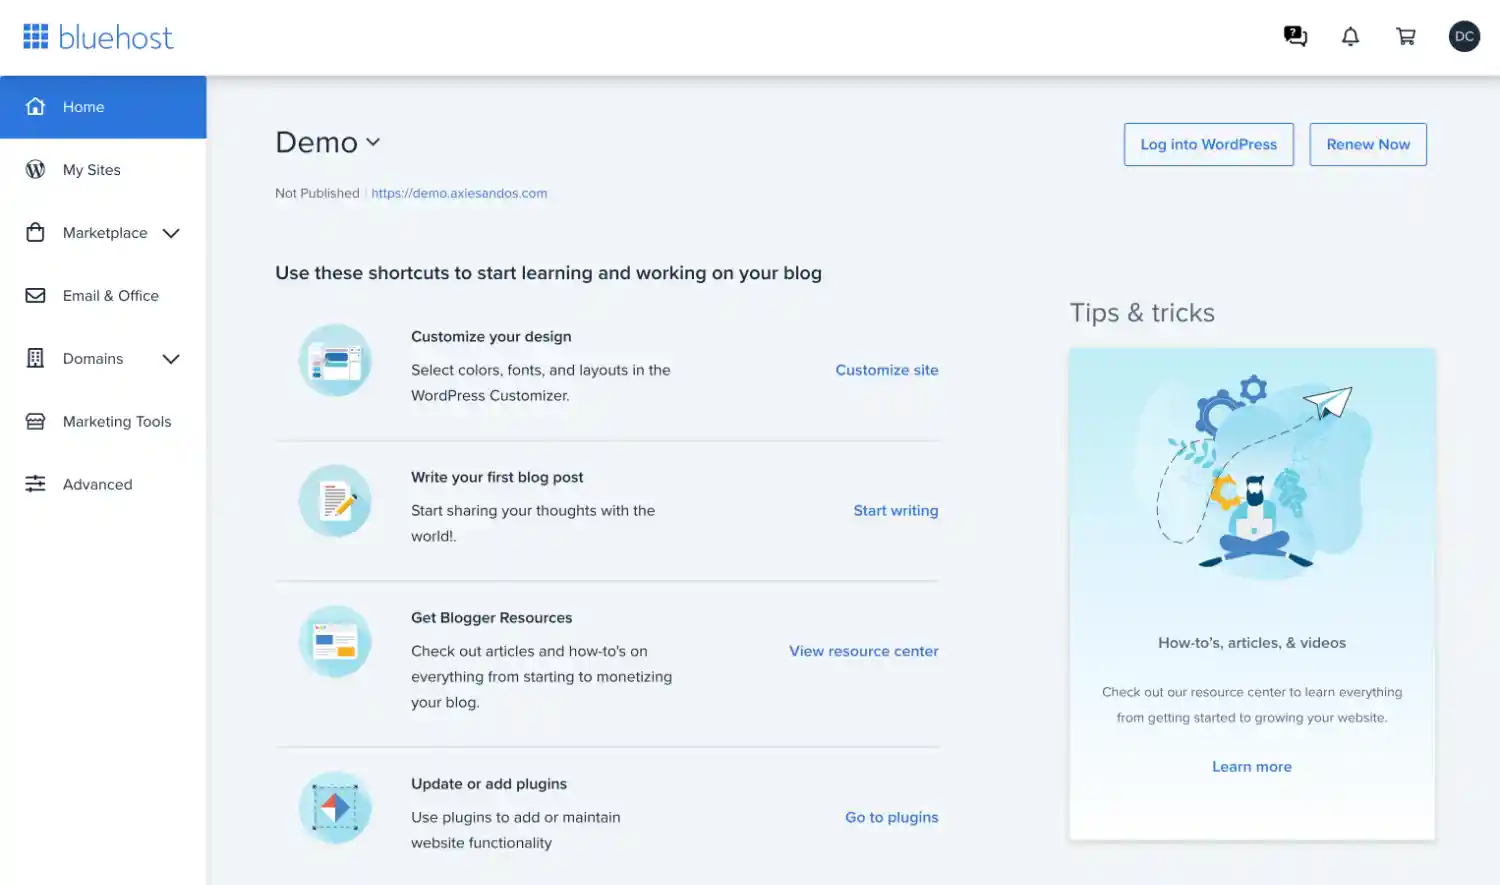
Your blog will be run on the WordPress platform. WordPress is a content management platform, or CMS. This is where you’ll actually write your blog posts, upload your images, and design the look of your website.
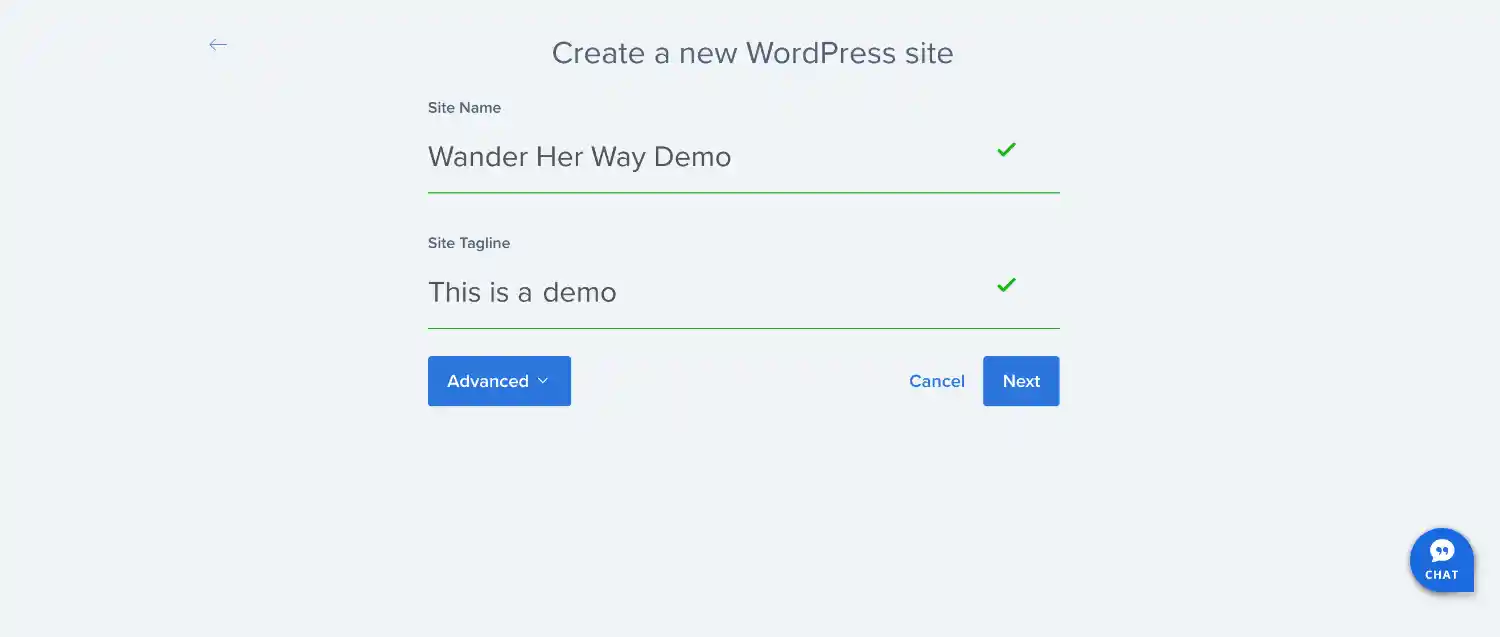
Bluehost installs WordPress automatically for you—all you have to do is answer a few questions when you get to your dashboard.
And don’t worry, they will walk you through the questions step-by-step and guide you through naming your blog, connecting your domain, and creating your WordPress site for you—it’s very easy!
Step 4: Designing your blog
Your blog will come with the default WordPress theme installed. You will definitely want to change this, which means it’s time to pick a theme for your blog!
To install your new theme, simply go to Appearance > Themes in the WordPress dashboard and upload your theme file there. Then go to Appearance > Customize to add you logo, change colors, pick your fonts, etc. Customizing your theme in WordPress is very easy and doesn’t require you to edit any code.
When it comes to designing your blog, you have a few options. Here are the most common:
- You can hire a web designer.
- You can buy and install a pre-designed child theme.
- You can install a theme that you can customize yourself.
Let’s look at each of these options:
Hire a web designer
This is the most expensive and least recommended route for a beginner blogger and not needed to have a profitable blog.
Buy A Premium Child Theme
A child theme is a theme that has been heavily customized by a designer and packaged in a way that you can install in your WordPress admin panel. A custom child theme comes with fonts, colors, and demo photos and content that you can swap out for your own. So other than changing the aesthetic elements, you’re set to start blogging with the click of a button.
Wander Her Way’ original theme was Vivienne by 17th Avenue Designs. I loved this theme! If you want to get it for yourself, just click the image below:

I should mention, however, that some design elements may slow down your website. But if having an a beautifully designed theme is really important to you, a premium theme is a much better investment for a beginner than a web designer.
Just be sure to pick a theme that performs as well as it looks and has great customer service and product support behind it.
Here are some premium theme designers I recommend:
Customize a Theme Yourself
Finally, you can customize a theme yourself.
I recommend installing and customizing a theme on your own because it’s MUCH cheaper and will give you more flexibility in the long-term. It’s not as difficult as you may think!
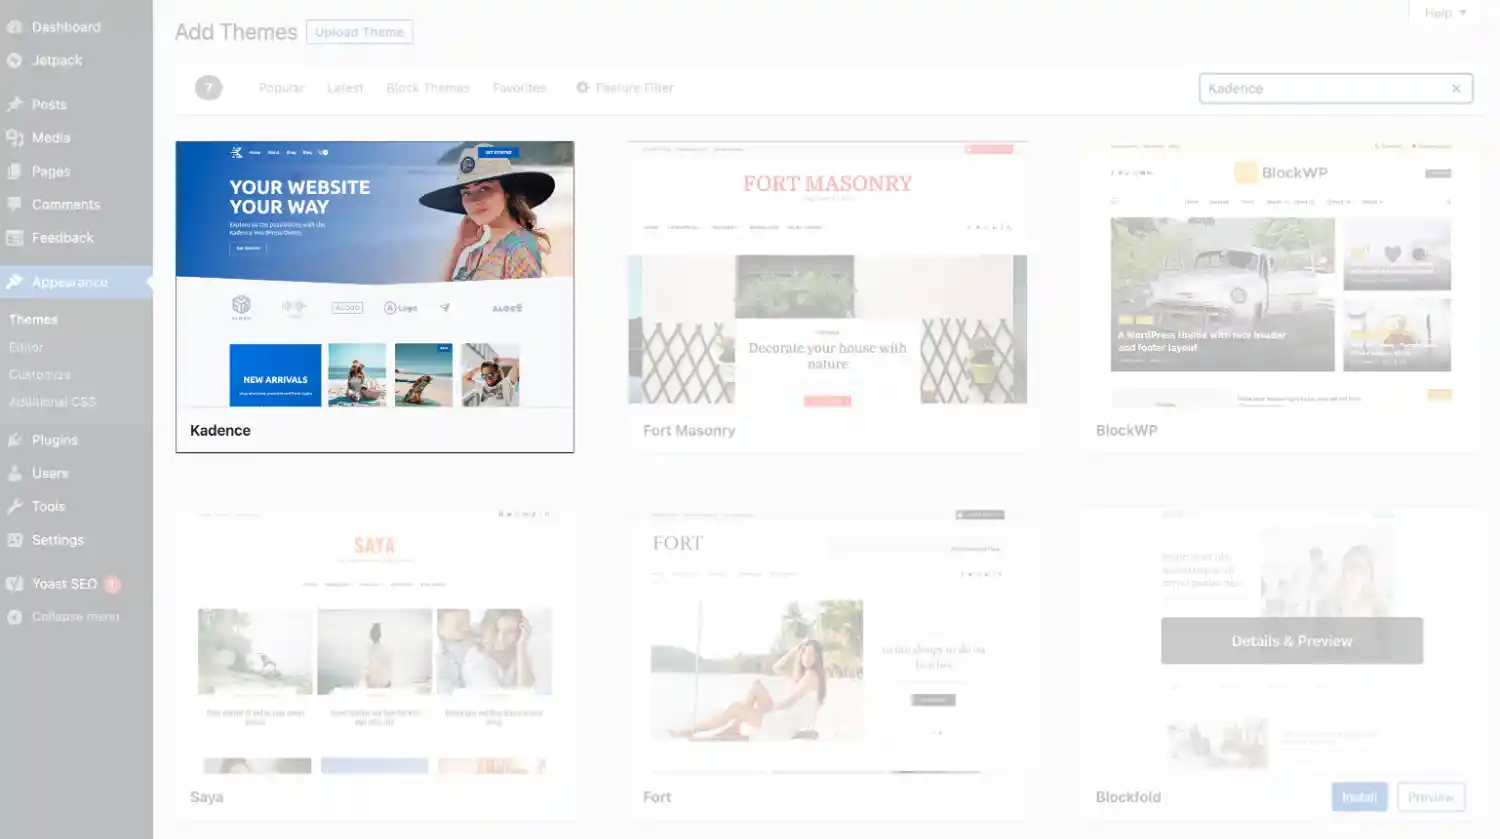
My favorite theme is Kadence WP, which has a free and a paid version. The free version will be more than enough to get you started with a fast and good-looking blog, which is all you really need.
The cool thing about Kadence is that, when combined with the Kadence Blocks plugin (which I’ll discuss in a minute), there’s no need for page builders.
Before blocks, page builders were the only way to have beautifully designed blogs and websites in WordPress without a professional web developer. The problem is page builders make your website heavy and slow. And you want light and fast!
This is why I recommend Kadence to new bloggers.
You can install the free version of the Kadence theme right from your WordPress admin panel tab with one click. Just go to Appearance > Add Themes and type Kadence in the search bar. Hit the install button then activate the theme. Voilà!
The free Kadence even comes with great looking starter templates that you can make your own and start blogging right away!
A theme like Kadence will give you a ton of room for your travel blog to grow. And as you gain experience, you can do more advanced customization and design changes to your Kadence theme.
That will save you going through the process of switching themes on an active blog! I wrote a whole piece about my experience changing the WordPress theme to Kadence on Wander Her Way.
👉 If you need help finding the perfect theme, make sure to check out my list of the best WordPress themes for travel blogs.
Step 5: Install plugins
WordPress plugins are applications that add extra functionality to your blog—think of them as apps on your phone.
There are thousands of plugins out there and some can be really useful but don’t go plugin happy! When it comes to plugins, less is better as they can also slow down your website and make it vulnerable to hackers.
Most blogs will end up having between 10-15 plugins and you should stick to that number.
To install plug-ins on your blog, just go to Plugins > Add New in the WordPress dashboard, search the name of the plugin, click Install and then click Activate.
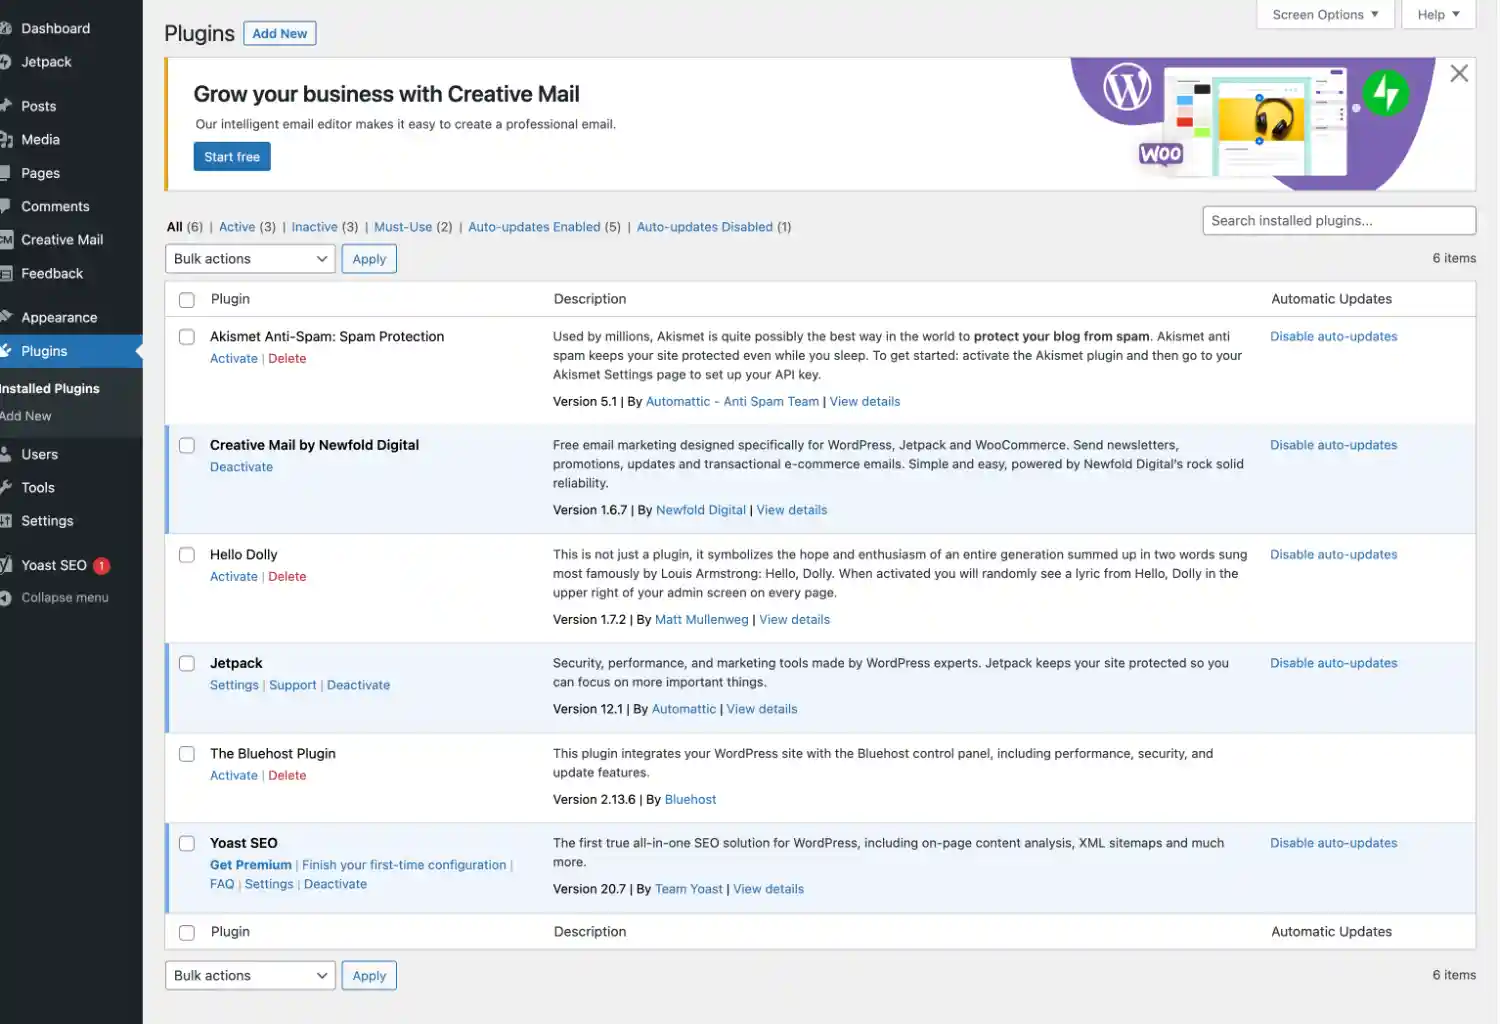
Bluehost Default Plugins
Your WordPress site will have a few plugins by default and you can activate them or delete them.
Here’s what you should do:
- The Bluehost Plugin: Activate it. While not required to run your blog, this plugin connects your WordPress to your Bluehost dashboard and gives you the ability to create a staging site. This is basically a working copy of your website that you can make changes to before pushing them live. It’s good practice to do that—in case something breaks, your live website is not affected.
- Akismet: Activate it. This plug-in filters out spam comments and form submissions on your blog. There are other ways of doing that without a plugin but it’s good to have as a beginner. The free version will be enough for you to get started.
- Hello Dolly: Delete it. It has zero functionally. Goodbye.
- Creative Mail: Delete it. This is an email marketing plugin by Bluehost itself. Just get rid of it… If you plan to start collecting emails, I recommend MailerLite, which is free for up to 1,000 subscribers.
- Yoast SEO: Delete. Yoast helps ensure your blog posts are setup in a way that makes it easy for Google and other search engines to find them—that’s what search engine optimization (SEO) is all about. Don’t get me wrong, Yoast SEO is a great friendly plugin but the free version of RankMath SEO is also easy to use and will give you a LOT more features than Yoast.
- Jetpack: Delete it. This plugin is infamously famous for slowing down websites like crazy, which is bad for SEO! I’ll suggest some alternatives.
Recommended Plugins for Beginners
Here are the plugins I recommend most for new bloggers are:
- WordFence Security: Great security plug-in to protect your site.
- Sassy Social Share: Adds social media share buttons to your blog posts. And you can customize them is a bunch of different ways.
- Autoptimize: Makes your website faster. Remember, fast loading pages = better SEO.
- UpdraftPlus: This plug-in makes regular backups of your site so you never lose anything!
- RankMath SEO: The free version of RankMath has a lot of features, including many that eliminate the need for additional plugins down the road. While Yoast may appear more user-friendly, RankMath will walk you through the setup step-by-step.
- Kadence Blocks: We talked about themes before and Kadence Blocks is the perfect complement to the Kadence Theme. Similar to RankMath, the added functionality and design options of Kadence Blocks will eliminate the need for other plugins in the future.
All of these plug-ins are 100% free to use. Some have premium versions with advanced features that are paid but you don’t really need any of that when you first start blogging.
Step 6: Start posting!
By now, you should have:
- Purchased a domain name and hosting through Bluehost
- Installed a WordPress theme on your travel blog
- Added some functionality to your website with essential plugins.
Now all that’s left is to start writing!
Before you officially launch your blog, I recommend having at least 5 to 10 posts already published, and another 5 to 10 ready to be published.
This will give people more content to read, more posts to share on social media, and put you a bit ahead in your publishing schedule.
Travel Blog: Not sure what to write about?
Don’t worry—even travel bloggers can get writer’s block!
Travel Blog Post Ideas
Here are just a few travel blog ideas to help you get started:
- Destination guides (where to stay, what to do, what to eat, etc)
- Top 10 things to do in a particular destination
- Packing list for a particular destination
- Travel tips or hacks (how to save money, how to book cheap flights, etc.)
- Reviews of hotels you have stayed at or tours you have taken
🔥 Want more? Here are 50+ travel blog post ideas that will come in handy if you need some inspiration on what to write about!
Repurpose Travel Blog Content
Even if you don’t travel all the time, you can repurpose a single trip into a ton of content for your blog.
For example, let’s say you took a three-week trip to India a while back. Here are 7 different blog post ideas you could write based on that one trip:
- The Ultimate Three-Week India Itinerary
- Top 10 Things to Do in India
- How to Save Money Traveling in India
- 10 Things to Know Before Traveling to India
- What to Pack for India
- Solo Female Safety Tips for India
- 10 Things That Surprised Me About India
Don’t be afraid to get creative with your ideas and let your personality shine through in your writing.
How to Make Money with a Travel Blog
If you read the income reports of travel bloggers, you can see the make money in many different ways.
Some of the most popular ways travel bloggers make money are:
- Display ads — these are advertisement like the ones you see along the bottom and within the content of this article.
- Direct advertising — bloggers can also sell ad space on their blog directly to brands and businesses. This is different than display ads, which are managed by a third-party ad network.
- Affiliate commissions — by recommending products and services, travel bloggers can earn small commissions of any purchase made through an affiliate link on their blog.
- Working with brands on sponsored content — similar to social media influencers, travel bloggers can work directly with a brand to create content and articles in exchange for a fee.
- Press Trips/Sponsored travel — destinations and brands may invite travel bloggers to experience the place and write about it and, in addition to free accommodations and activities, some may also receive payment for the coverage.
- Selling travel packages — who better to create incredible travel packages than people who have truly experienced those destinations?
- Services and freelancing — some travel bloggers provide services like travel planning, travel writing, photography, web design, and SEO.
- Selling their own products — courses, coaching, and digital downloads are examples of this.
💰 Learn how to make money with a travel blog.
Travel Blogging Community
If you want to start making make money with your travel blog early on, I highly recommend joining Travel Blog Prosperity.
It’s a monthly membership for travel bloggers created by Jessie Festa from Jessie on a Journey—one of the most successful travel blogs out there.
When you join the membership, you’ll get immediate access to the following:
- 30+ training and lessons for bloggers, with new ones added monthly
- Workbooks and checklists to go along with each lesson
- Twice monthly live group coaching calls with Jessie
- Weekly VIP Opportunities Newsletter with paid opportunities, press trips, and more!
- Private Member’s Lounge group where you can get your questions answered.
- And much more!
Normally, the membership is $49/month, but when you sign up using my discount code WANDER9 you will get your first month of Travel Blog Prosperity for just $9 bucks!
👉 Try a month of Travel Blog Prosperity for only $9 (use with promo code WANDER9)
5 Reasons to Start a Travel Blog (And 3 Reasons You Shouldn’t)
Reasons you should start your own travel blog
Document your travels.
One of the main reasons to start a travel blog is to document your travels.
If you’re going on a long-term trip, moving abroad, or studying abroad, starting a travel blog can be a great way to keep friends and family at home in the loop.
It’s also like creating a digital journal/scrapbook of your travels to look back on forever!
Have a creative outlet.
Blogging can also be a great creative outlet. You get a chance to write (a lot!) and work on your photography skills. It’s also fun coming up with unique blog post ideas.
I definitely have a lot of “Top 10 Things to Do in X” and “Where to Stay in X” type posts on my blog, but I also enjoy coming up with more creative things to write about too.
Help other travelers.
One of my favorite things about travel blogging is being able to help other travelers.
Whether it’s sharing secret tips I picked up during my travels (like how to take a gondola ride in Venice for two euros) or helping travelers in my hometown (by sharing the common New York mistakes to avoid) I enjoy being able to provide useful information on my blog.
It’s even better when someone leaves a comment or sends me an email saying they found it helpful!
Make money blogging.
I’d be lying if I said I didn’t intend to monetize my blog from the very beginning!
Having a travel blog can be a great way to start your own business and make money online, allowing you to travel and work from anywhere. Currently, Wander Her Way earns money from a combination of display advertising, affiliate marketing, and sponsored blog posts.
Use it as a portfolio for work.
Related to above, you can also use your travel blog as a portfolio to help you obtain other work opportunities, such as freelance writing or freelance photography jobs.
I have not personally done this, because I just monetize my blog directly, but if you want to get into a career as a travel writer or photographer, this is a great reason to start a travel blog.
Reasons NOT to Start a Travel Blog
So now that we’ve talked about some of the reasons you should start a travel blog, let’s talk about three of the reasons you should NOT start a travel blog.
You want to make money fast.
Blogging is not a get-rich-quick scheme. It might seem easy from the outside looking in, but it actually takes a lot of work to be successful and make money blogging.
There are no shortcuts you can take, so if you aren’t willing to put in the work, blogging isn’t going to be for you. A lot of people also think they can start a travel blog to fund their travels, but if that’s what you want to do, you need to start planning WAY in advance.
For example, I started my travel blog over two years before I actually quit my job to travel.
You want a bunch of free stuff.
There’s another myth going around that bloggers are “paid to travel” and that could not be further from the truth. Yes, it’s possible to get free press trips and comped hotel stays in exchange for blog coverage (sometimes paid, sometimes unpaid) but it’s very competitive and takes a LOT of work.
In fact, that’s why I prefer to pay for my own travels and monetize my blog with more passive income sources like display advertising and affiliate marketing instead.
You aren’t passionate about travel.
And for the final reason not to start a travel blog, this should go without saying, but it’s not worth it to start a travel blog if you aren’t 100% passionate about travel.
If travel is something you don’t really care about, it WILL come through in your writing, and you WILL get burnt out!
Recap: How to Start a Travel Blogging
This guide showed you how to start a travel blog in just six easy steps. As a recap, here’s what you need to do:
- Choose a niche for your blog.
- Choose name for your blog and a matching domain name.
- Get web hosting and register your FREE domain at Bluehost.
- Install a WordPress theme. Check out my my favorite WordPress themes.
- Install WordPress plugins.
- Start blogging! Use with these awesome 50 travel blog post ideas for inspiration.
Do you have any questions at all about how to start a travel blog? You can sign up for my FREE e-mail course:
More Travel Blogging Tips
This post is part of my ongoing series about travel blogging. For more tips on travel blogging, be sure to read the following:
- Travel Blog Names: How to Choose One + Ideas
- How to Make Money with a Travel Blog
- 6 Best WordPress Themes for Travel Blogs
- 50 Travel Blog Post Ideas
- Travel Blog Income Report Roundup
Save it to Pinterest:

About Denise Cruz
Denise is a marketing executive who escaped corporate to travel the world… twice. A Brazilian native living in the U.S., she’s lived in 4 countries and visited 35+ others. After side-hustling her way to financial independence, she curates solo destination guides, slow travel tips, and travel blogging advice on Wander Her Way. When she’s not on the road, you can find her in Miami with her dog Finnegan.